Tycho
Tycho is an API, compiler, and executor for cloud native distributed systems.
A subset of docker-compose is the system specification syntax.
Kubernetes is the first supported orchestrator.
Goals
Application Simplity: The Kubernetes API is reliable, extensive, and well documented. It is also large, complex, supports a range of possibilities greater than many applications need, and often requires the creation and control of many objects to execute comparatively simple scenarios. Tycho bridges the simplicity of Compose to the richness of the Kubernetes’ architecture.
Microservice: We wanted an end to end Python 12-factory style OpenAPI microservice that fits seamlessly into a Python ecosystem (which is why we did not use the excellent Kompose tool as a starting point).
Lifecycle Management: Tycho treats distributed systems as programs whose entire lifecycle can be programmatically managed via an API.
Pluggable Orchestrators: The Tycho compiler abstracts clients from the orchestrator. It creates an abstract syntax tree to model input systems and generates orchestrator specific artifacts.
Policy: Tycho now generates network policy configurations governing the ingress and egress of traffic to systems. We anticipate generalizing the policy layer to allow security and other concerns to be woven into a deployment dynamically.
Design
The application programming interface (API) is an OpenAPI endpoint. It includes start, status, and delete operations. Start takes a docker-compose system specification, environment settings, and service metadata as input. It parses these into an abstract syntax tree representing a distributed system. It then calls an orchestrator specific back end to generate and execute the system on a compute bakcplane. This process incorporates policy configurations to control elements like network access and isolation. Status returns information about executing systems. Delete remoes all generated artifacts from the compute cluster.
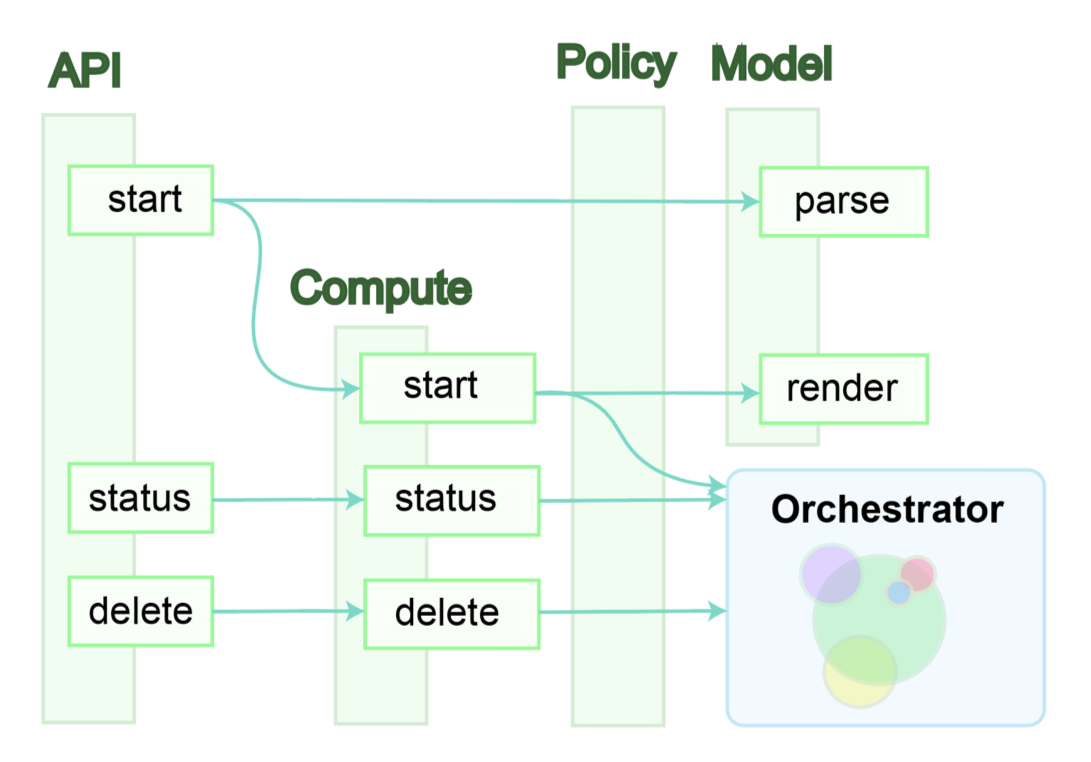
Tycho architecture.
Install
Install and start minikube
Install python 3.7.x or greater.
Create a virtual environment.
Install the requirements.
Start the server.:
python3 -m venv environmentName
source environmentName/bin/activate
pip install -r requirements.txt
export PATH=<tycho-repo-dir>/bin:$PATH
tycho api --debug
Scenarios
1. Development Environment Next to Minikube
The API can be run next to Minikube. In this mode, it locates the K8S configuration based on the environment. Systems will be created in Minikube based on that configuration. This is the only practical mode for development. Running with the debug flag gives lots of feedback on what the server is doing and what errors it encounters.
2. Development Environment Within Minikube
In the repos kubernetes directory, we define deployment, pod, service, clusterrole, and clusterrolebinding models for Tycho. The following interaction shows deploying Tycho into Minikube and interacting with the API. If you just plan to use Tycho but don’t plan to do any development, this is a good option.
Deploy all Kubernetes Tycho-api artifacts into Minkube:
(tycho) [scox@mac~/dev/tycho/tycho]$ kubectl create -f ../kubernetes/
deployment.extensions/tycho-api created
pod/tycho-api created
clusterrole.rbac.authorization.k8s.io/tycho-api-access created
clusterrolebinding.rbac.authorization.k8s.io/tycho-api-access created
service/tycho-api created
3. Within GKE from the Google Cloud Shell
Tycho can be used in Google Kubernetes Engine (GKE). Install the Kubernetes artifacts from the gcloud SDK or shell as above.
Once applications are deployed with Tycho, the load balancer service will provision an public IP address for the service. To use this:
$ tycho status
SYSTEM                         GUID                                IP_ADDRESS      PORT
jupyter-datascience            4987932d9dfb44e0b93479538d2ef10d    35.221.9.27     31934
Command Line Interface
You can use Tycho from the command line to interact with the cluster.
Clone the repo) and add the bin directory to your path:
export PATH=<repo>/bin:$PATH
Given this docker-compose.yaml:
---
# Docker compose formatted system.
version: "3"
services:
  jupyter-datascience:
    image: jupyter/datascience-notebook
    entrypoint: start.sh jupyter lab --LabApp.token=
    ports:
      - 8888:8888
Deploy it with:
$ tycho up -f docker-compose.yaml
Check its status with:
$ tycho status
or:
$ tycho status -terse
After a few moments, test the service with:
$ mkip=$(minikube ip)
$ wget --quiet -O- http://$mkip:$(tycho status | grep jupyter | grep -v PORT | awk '{ print $4 }') | grep "/title"
And delete the service with:
$ tycho down <GUID>
or delete all running services with:
$ tycho down $(tycho status -terse)
Python API
To use Tycho from Python, clone the repo and put it in your PYTHONPATH:
$ export PYTHONPATH=<path/to/tycho/repo>:$PATH
To connect to a Tycho instance running inside Kubernetes:
from tycho.client import TychoFactory
client_factory = TychoClientFactory ()
client = client_factory.get_client ()
To connect to a locally running instance:
from tycho.client import TychoClient
client = TychoClient (url="http://localhost:5000")
To start a simple service:
client.start (
  request = {
    "name": "test",
    "env": {
      "LOCAL_STORE" : "/data",
      "HOST_PATH" : "8888"
    },
    "system": {
      "version": "3",
      "services": {
        "jupyter-datascience": {
          "image": "jupyter/datascience-notebook",
          "entrypoint": "start.sh jupyter lab --LabApp.token=",
          "ports": [
            "$HOST_PORT:8888"
          ],
          "volumes": [
            "$LOCAL_STORE:/mydata",
            "./:/mydata1",
            "./home:/mydata2"
          ],
          "deploy": {
            "resources": {
              "limits": {
                "cpus": "0.01",
                "memory": "50M"
              },
              "reservations": {
                "cpus": "0.01",
                "memory": "20M"
              }
            }
          }
        }
      }
    },
    "services": {
      "jupyter-datascience": {
        "port": "8888"
      }
    }
  })
response = client.start (request)